XOS Tool Chain (Internals)
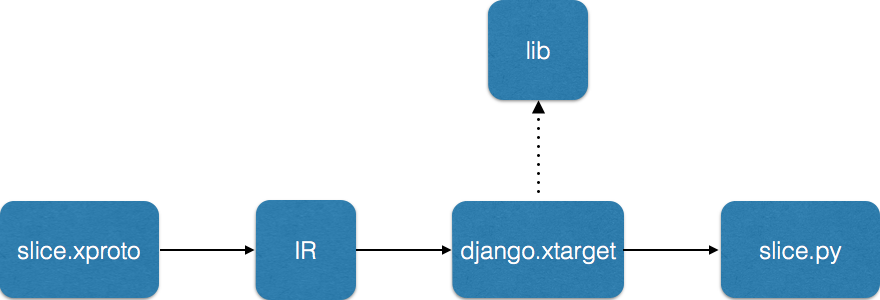
The xosgenx tool converts a xproto file into an intermediate representation and
passes it to a target, which in turn generates the output code. The target has
access to a library of auxiliary functions implemented in Python. The target
itself is written as a jinja2 template. The following figure depicts the
processing pipeline, using the slice.xproto model and Django
target as an example.
Note: Developers will not need to interact with xosgenx directly, except when there is an opportunity to create a new target.
Intermediate Representation (IR)
The IR is a representation of a parsed xproto file in the form of nested Python dictionaries. Here is a description of its structure.
"proto": {
    "messages": [
         {"name": "foo", fields: [{...}], links: [{...}], rlinks: [{...}], options: [{...}]}
    ]
},
"context": {
    "command line option 1": "value - see the --kv option of xosgenx"
},
"options": {
    "top level option 1": "value of option 1"
}
Library Functions
xproto targets can use a set of library functions implemented in Python. These
can be found in the file lib.py in the genx/tool directory. These functions
are listed below:
xproto_unquote(string)Unquotes a string. For example,"This is a help string"is converted intoThis is a help string.xproto_singularize(field)Converts an English plural into its singular. It is extracted from thesingularoption for a field if such an option is specified. Otherwise, it performs the conversion automatically using the librarypattern.en.xproto_pluralize(field)The reverse ofxproto_singularize.
Targets
A target is a template written in jinja2 that takes the IR as input and generates code (a text file) as output. Common targets are Python, Protobufs, unit tests, and so on. The following example shows how to generate a GraphViz dot file from a set of xproto specifications:
digraph {
{% for m in proto.messages -%}
  {%- for l in m.links %}
  {{ m.name }} -> {{ l.peer }};
  {%- endfor %}
{% endfor %}
}
This template loops through all of the messages in a proto definition and then through the links in each message. For each link, it formats and outputs an edge in a graph in Graphviz dot notation.
{{ proto }}
This target simply prints the IR for an xproto definition.
{% for m in proto.messages -%}
{% for r in m.rlinks %}
    def enumerate_{{ xos_singularize(r) }}_ids:
        return map(lambda x:x['id'], {{ xos_pluralize(r) }})
{% endfor %}
{% endfor -%}
The example target outputs a Python function that enumerates the ids of the objects from which the current object is linked.
An example set of target definitions can be found in
$SRC_DIR/lib/xos-genx/xosgenx/targets/.
Running xosgenx
It is possible to run the xosgenx tool chain directly. This is useful, for example, when developing a new target.
To do do, first setup the python virtual environment as described in the unit
testing docs. Then drop an xproto file in your working directory.
For example, you can copy-and-paste the following content into a file named
slice.xproto:
message Slice::slice_policy (XOSBase) {
     option validators = "slice_name:Slice name ({obj.name}) must begin with site login_base ({ obj.site.login_base}), slice_name_length_and_no_spaces:Slice name too short or contains spaces, slice_has_creator:Slice has no creator";
     option plural = "Slices";

     required string name = 1 [max_length = 80, content_type = "stripped", blank = False, help_text = "The Name of the Slice", null = False, db_index = False];
     required bool enabled = 2 [help_text = "Status for this Slice", default = True, null = False, db_index = False, blank = True];
     required string description = 4 [help_text = "High level description of the slice and expected activities", max_length = 1024, null = False, db_index = False, blank = True, text = True];
     required string slice_url = 5 [db_index = False, max_length = 512, null = False, content_type = "url", blank = True];
     required manytoone site->Site:slices = 6 [help_text = "The Site this Slice belongs to", null = False, db_index = True, blank = False];
     required int32 max_instances = 7 [default = 10, null = False, db_index = False, blank = False];
     optional manytoone service->Service:slices = 8 [db_index = True, null = True, blank = True];
     optional string network = 9 [blank = True, max_length = 256, null = True, db_index = False, choices = "((None, 'Default'), ('host', 'Host'), ('bridged', 'Bridged'), ('noauto', 'No Automatic Networks'))"];
     optional string exposed_ports = 10 [db_index = False, max_length = 256, null = True, blank = True];
     optional manytoone creator->User:slices = 12 [db_index = True, null = True, blank = True];
     optional manytoone default_flavor->Flavor:slices = 13 [db_index = True, null = True, blank = True];
     optional manytoone default_image->Image:slices = 14 [db_index = True, null = True, blank = True];
     optional manytoone default_node->Node:slices = 15 [db_index = True, null = True, blank = True];
     optional string mount_data_sets = 16 [default = "GenBank", max_length = 256, content_type = "stripped", blank = True, null = True, db_index = False];
     required string default_isolation = 17 [default = "vm", choices = "(('vm', 'Virtual Machine'), ('container', 'Container'), ('container_vm', 'Container In VM'))", max_length = 30, blank = False, null = False, db_index = False];
}
One of the existing targets is Django, which currently serves as the Object-Relational Mapping (ORM) tool used in CORD. To generate a Django model starting from this xproto file you can use:
xosgenx --target="django.xtarget" --output=. --write-to-file="model" --dest-extension="py" slice.xproto
This generates a file called slice.py in your current directory. If there
were multiple files, then it generates python Django models for each of them.
You can print the tool’s syntax by running xosgenx --help.
usage: xosgenx [-h] [--rev] [--output OUTPUT] [--attic ATTIC] [--kvpairs KV]
               [--write-to-file {single,model,target}] [--version] [-v]
               [--include-models INCLUDE_MODELS] [--include-apps INCLUDE_APPS]
               [--dest-file DEST_FILE | --dest-extension DEST_EXTENSION]
               (--target TARGET | --checkers CHECKERS | --lint)
               [--strict-validation]
               <input file> [<input file> ...]

XOS Generative Toolchain

positional arguments:
  <input file>          xproto files to compile

optional arguments:
  -h, --help            show this help message and exit
  --rev                 Convert proto to xproto
  --output OUTPUT       Destination dir
  --attic ATTIC         The location at which static files are stored
  --kvpairs KV          Key value pairs to make available to the target
  --write-to-file {single,model,target}
                        Single output file (single) or output file per model
                        (model) or let target decide (target)
  --version             show program's version number and exit
  -v, --verbosity       increase output verbosity
  --include-models INCLUDE_MODELS
                        list of models to include
  --include-apps INCLUDE_APPS
                        list of models to include
  --dest-file DEST_FILE
                        Output file name (if write-to-file is set to single)
  --dest-extension DEST_EXTENSION
                        Output file extension (if write-to-file is set to
                        single)
  --target TARGET       Output format, corresponding to <output>.yaml file
  --checkers CHECKERS   Comma-separated list of static checkers
  --lint                Parse the xproto but don't execute any xtargets
  --strict-validation   Exit if validation fails
For example usage of xosgenx, see the Dockerfiles in
$SRC_DIR/containers/xos/.